


Tutorials
Use 3D assets in
![View details about our figma plugin]()
![View details about our adobe XD plugin]()
![View details about our google slides plugin]()
![View details about our powerpoint plugin]()
Free 3D Icons
Use Lottie animations in
![View details about our figma plugin]()
![View details about our canva plugin]()
![View details about our adobe XD plugin]()
![View details about our google slides plugin]()
![View details about our powerpoint plugin]()
Free Lottie Animations
Use Illustrations in
![View details about our figma plugin]()
![View details about our canva plugin]()
![View details about our adobe XD plugin]()
![View details about our google slides plugin]()
![View details about our powerpoint plugin]()
![View details about our MacOS plugin]()
![View details about our windows plugin]()
Free Illustrations
Use AI in
![View details about our figma plugin]()
AI Images
Smart Tools
glTF 3D Editor
Edit 3D icons & export glTF/GLB models for web & AR.
File Converter
Batch convert assets to SVG, PNG, PDF, & EPS instantly.
Illustration Kit Editor
Mix & match styles to build custom vector illustrations.
IconScout API
Integrate millions of design assets via our REST API.
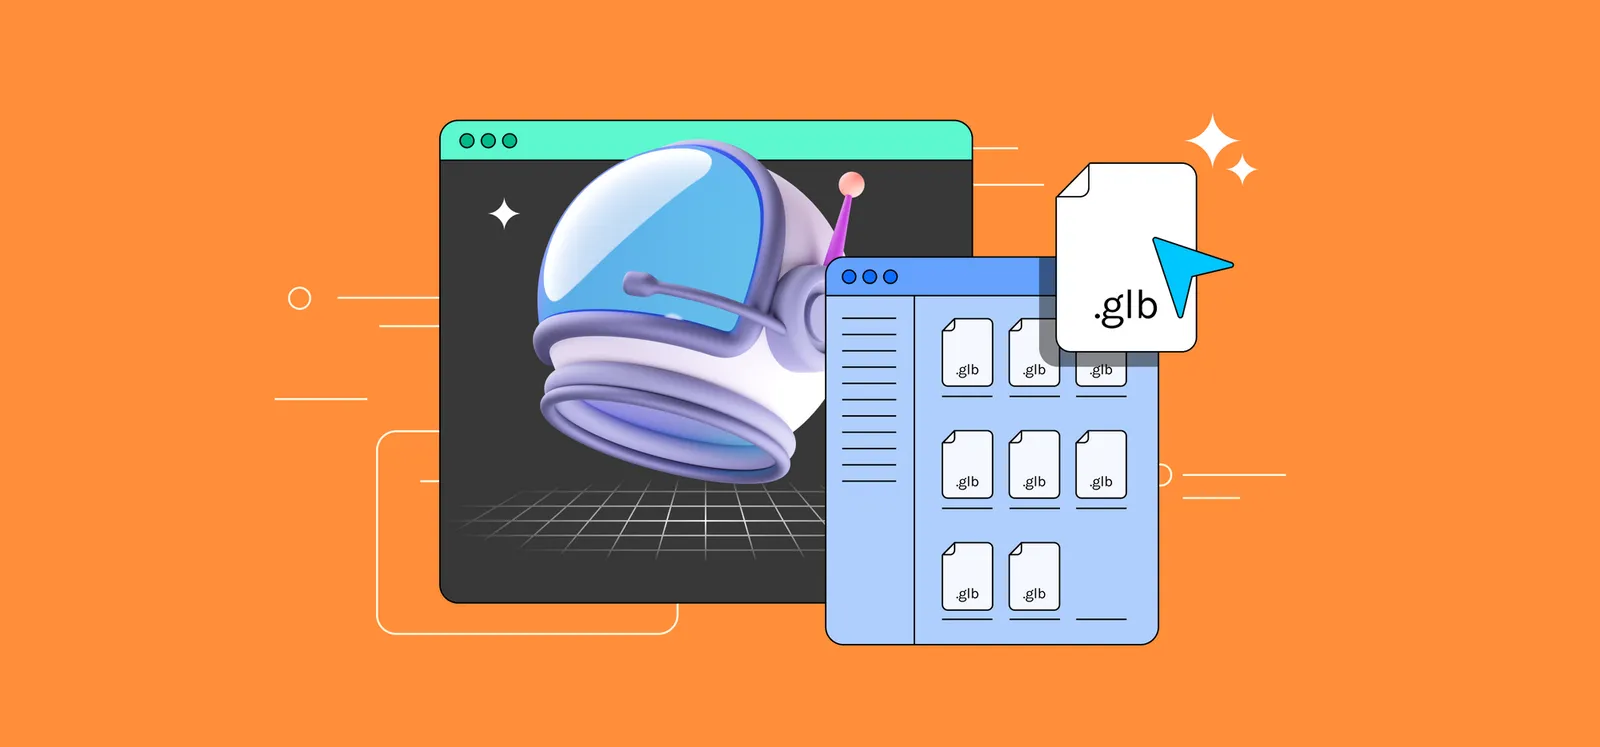
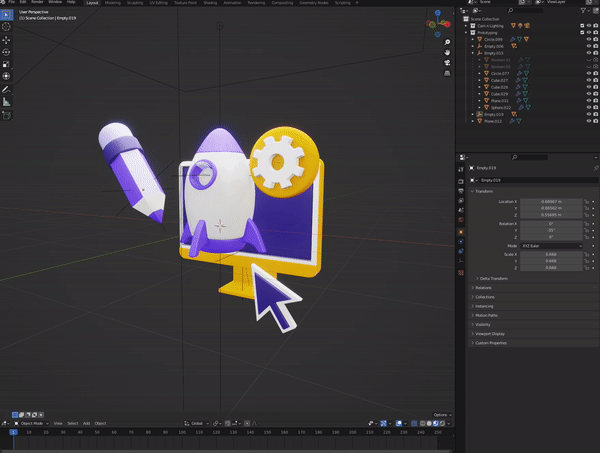
How to Export glTF Files From Blender
Exporting your 3D scene or model to a glTF file is easy. Here’s how to prep your assets for exporting.
Noticed a new IconScout feature?
That’s right, IconScout now supports glTF files. If you’re not familiar with this file format, no worries. We’ll go through what glTF files are and why they are exciting – both for users looking to download 3D illustrations, and for IconScout contributors. Then we’ll show how you can export your 3D assets as a glTF file, so that you can upload it to IconScout.
What is a glTF file?
A glTF (GL Transmission Format) is a file format for 3D scenes and models. It’s a text-based file that uses either the .gltf (JSON/ASCII) or .glb (binary file format) file extensions.
Why use glTF files?
Here’s why glTF stands out from other formats like OBJ:
- Lightweight and fast: glTF files are smaller and load faster, offering better performance.
- Open standard: The format is supported across various platforms like the web, mobile, augmented reality (AR) and virtual reality (VR) apps.
- Widespread compatibility: Known as the "JPEG of 3D," glTF is perfect for sharing 3D assets seamlessly.
Thanks to this performance and widespread compatibility, its creators have called it the “JPEG of 3D”.
With that, IconScout has introduced glTF support to its 3D illustrations, offering more flexibility to users. With our built-in glTF viewer, you can instantly update assets with custom color palettes or choose from preset options, while also viewing 3D files in 360°. This new feature benefits IconScout contributors by expanding their audience reach, increasing the potential for downloads, and enabling users to easily customize 3D assets to match their brand.
Of course, this means that you'll have to prepare your 3D assets as glTF files, which brings us to our next section.
How to export glTF format files from Blender
So how do you export your existing 3D assets as glTF files? Here’s how with Blender.
1. Blender setup
If you don’t already have Blender installed, download the latest version of Blender.
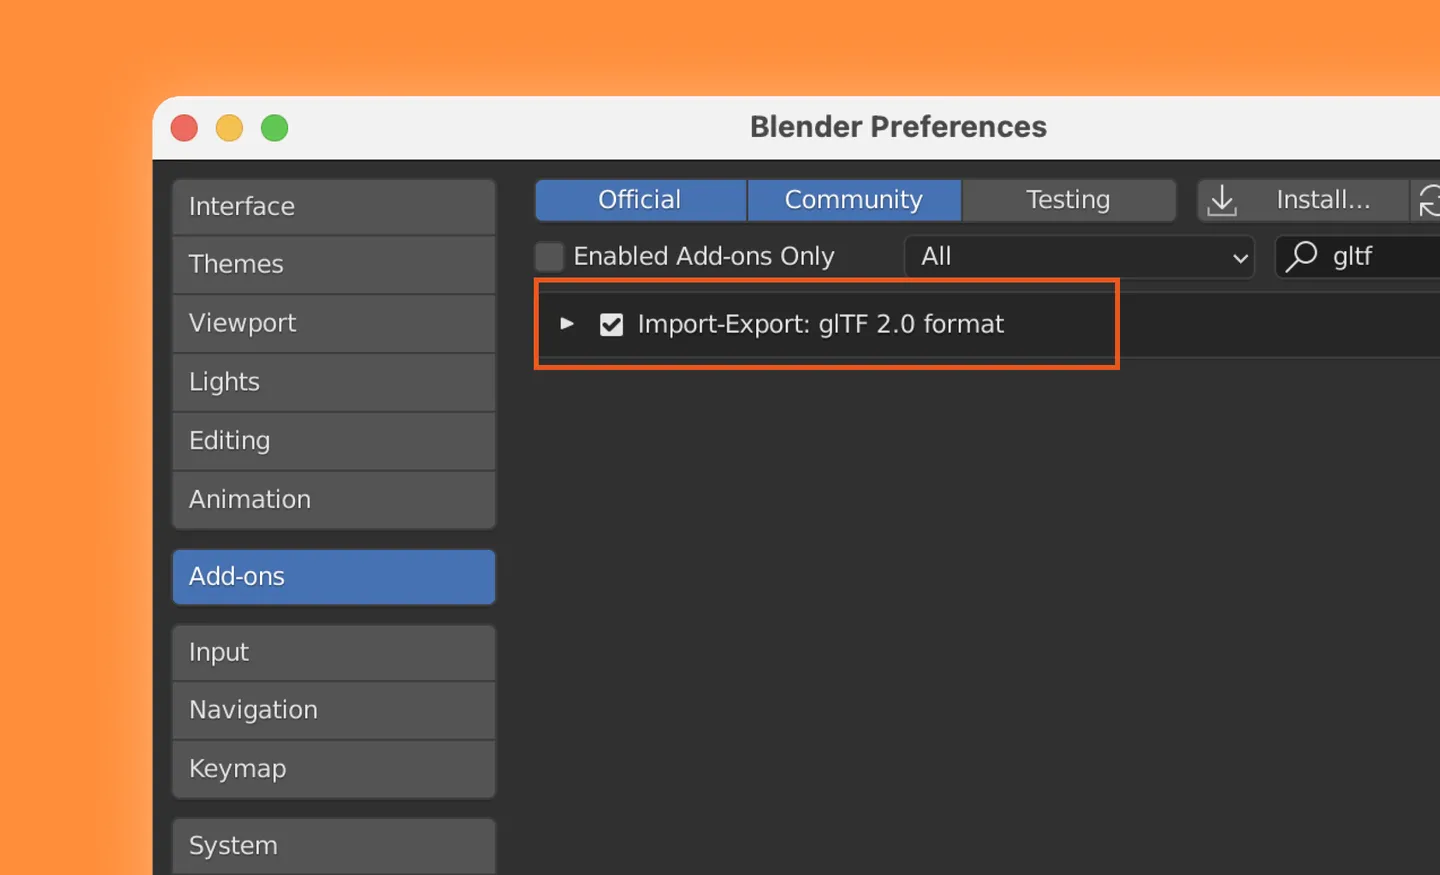
By default, Blender 2.8 and higher supports glTF imports and exports. But just in case, let’s make sure it’s enabled in Blender.
- Run the Blender application.
- Go to Edit > Preferences > Add-ons
- Search for ‘glTF’
- Enable Import-Export glTF 2.0 format
2. Import your 3D assets
Now that you have Blender set up, you can open the 3D assets you want to export as a glTF format file. There are three ways to do this:
- Method 1 - Click or drag your BLEND file into Blender.
- Method 2 - Go to File > Open > Browse and select the BLEND file > Open
- Method 3 - If you importing different file formats, like OBJ or FBX, go to File > Import > Select a 3D format > Browse and select the file > Import
3. Get your 3D assets ready for export
Not everything in your scene may be supported by the glTF file format, so we’ll need to make them glTF-friendly.
a) Convert curves or other non-mesh objects to mesh
The glTF file format doesn’t support curves and other non-mesh objects – like metaballs, surfaces, or text objects – so we need to convert them into meshes before exporting. Here’s how to do so:
- Select the curve, metaball, surface or text object.
- Right click > Convert To > Mesh.
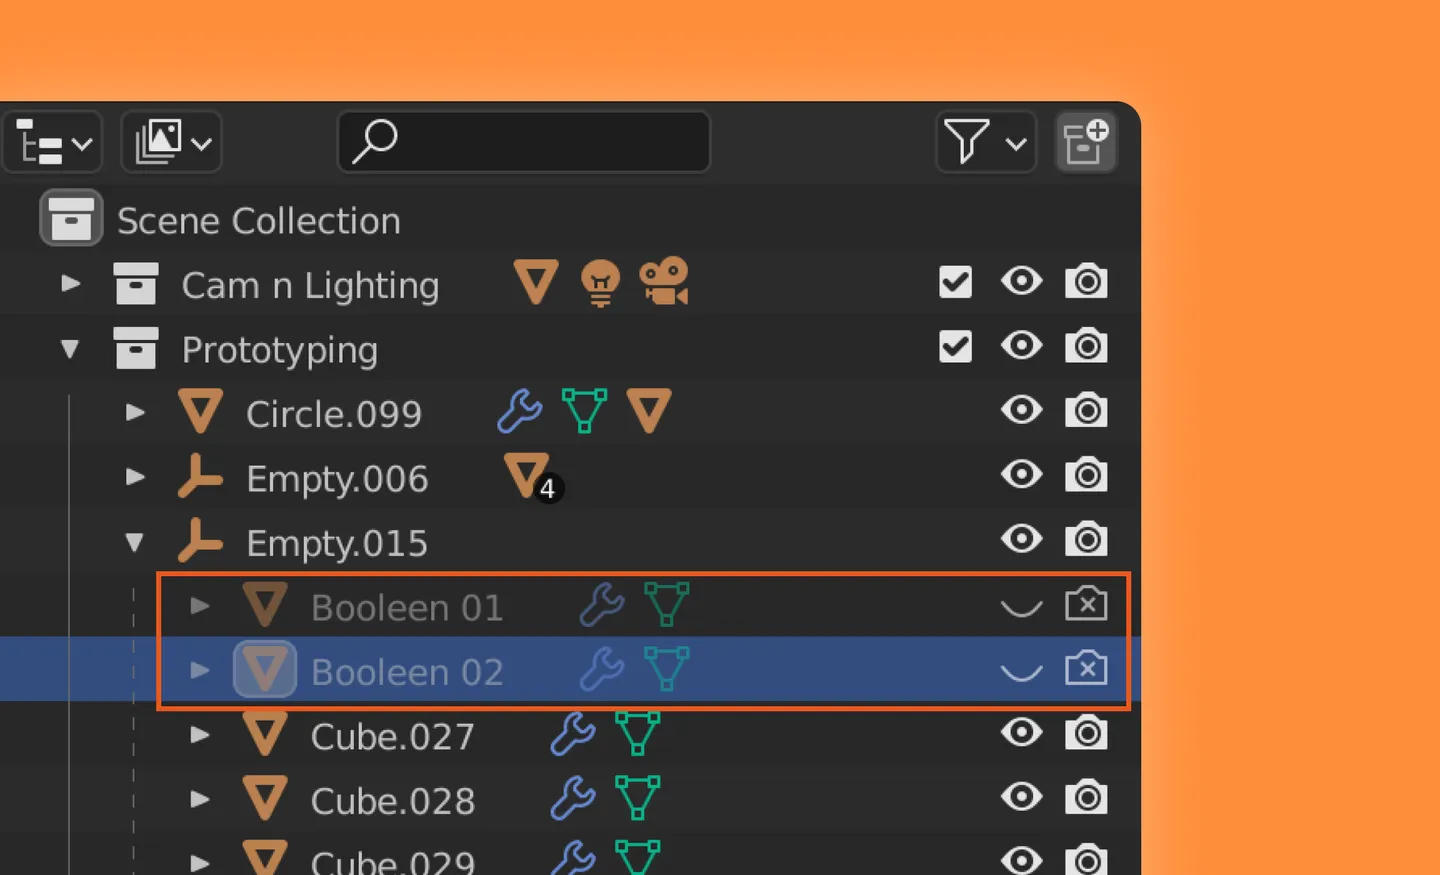
b) Hide unwanted elements
Hide any elements you don’t want appearing in your glTF file format. For example, check your Outliner and hide any operational meshes such as Booleans – these meshes shouldn’t be visible in the export.
c) Check your Levels Viewport
If you’ve used a Subdivision modifier on your asset, you may need to adjust your Levels Viewport. This helps keeps your glTF file size small.
- Open the Modifier Properties panel.
- Look for the Subdivision modifier.
- Adjust the Levels Viewport – we recommend keeping it around 1 to 3. A larger size will increase the glTF file size.
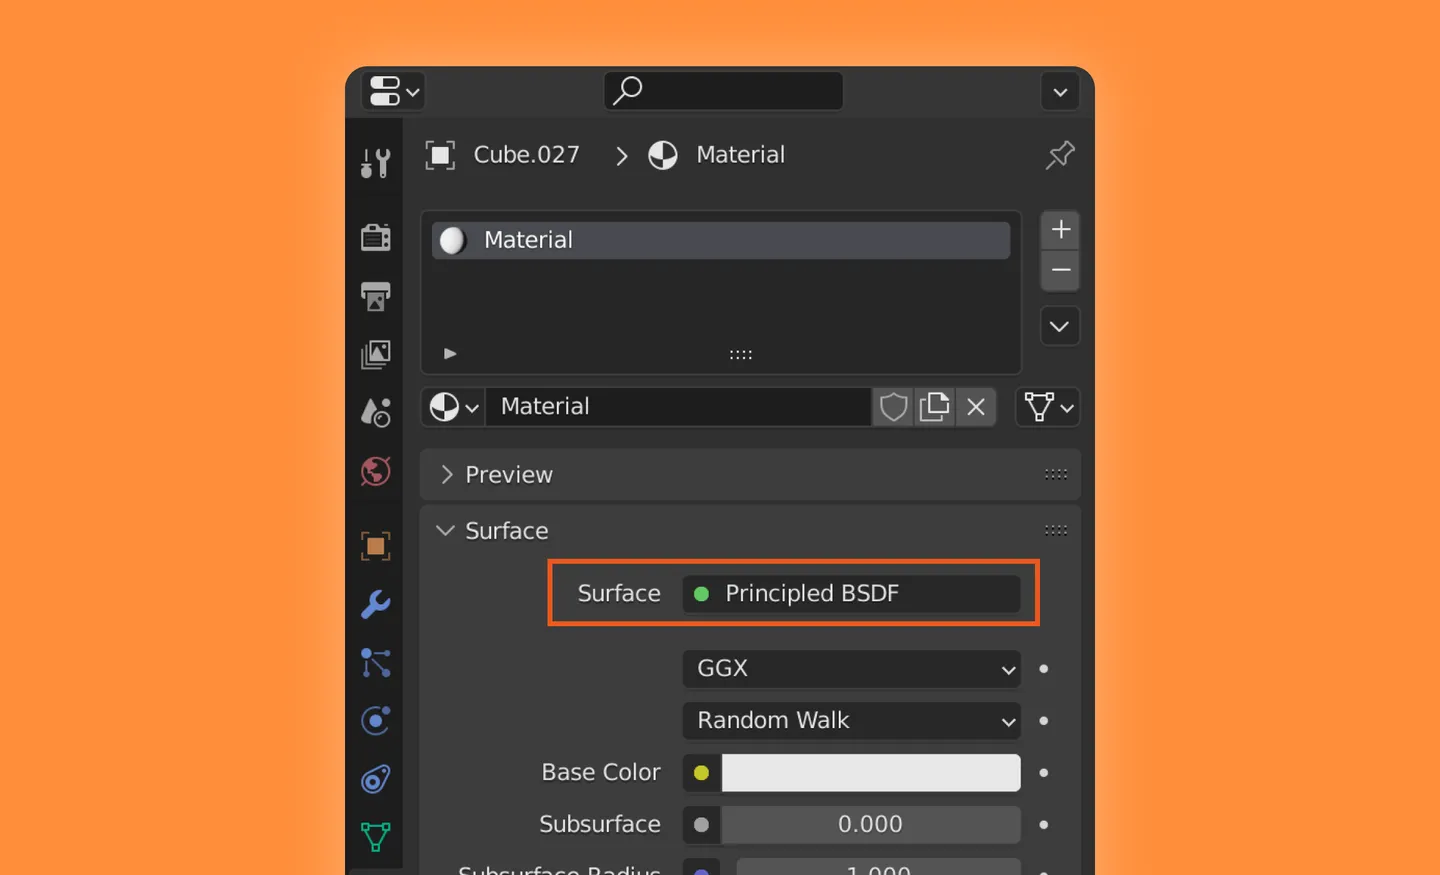
c) Use supported materials
The glTF format supports a metal/rough PBR (physically based rendering) workflow. Make sure that your asset or model uses supported materials. By default, Blender uses the Principled BSDF shader, which creates materials that are supported when exporting to glTF.
If you’re using a different shader, we’d suggest switching over to Principled BSDF. Go to the Material Properties panel, look at the Surface property and select Principled BSDF.
4. Export to glTF
We’re almost done. But before we export our glTF file, it’s helpful to be aware of the different file format variations. In Blender, you can export your scene or model as three types of glTF formats:
- glTF Binary (.glb)
- A single .glb file that contains all the mesh data, image textures, and other information.
- glTF Separate (.gltf + .bin + textures)
- A JSON text-based file that describes the overall structure
- A .bin file that contains mesh and vector data
- Optionally, .png or .jpg files that contain image textures
- glTF Embedded (.gltf)
- A JSON text-based file, containing all the mesh and image data encoded (using Base64).
glTF Binary (.glb)glTF Separate (.gltf + .bin + textures)glTF Embedded (.gltf)A single .glb file that contains all the mesh data, image textures, and other information.A JSON text-based file that describes the overall structure A .bin file that contains mesh and vector data Optionally, .png or .jpg files that contain image texturesA JSON text-based file, containing all the mesh and image data encoded (using Base64).
In this tutorial, we’ll use the glTF Binary (.glb) file format, as it’s a single file that makes it easy to share across platforms. And in contrast to the glTF Embedded (.gltf) format, it’s generally smaller and more efficient.
To export your scene or model, just select the meshes you want to export. You don’t have to select any lighting elements if you are uploading your glTF file to IconScout, as IconScout’s glTF viewer will use its own lighting to illuminate the assets.
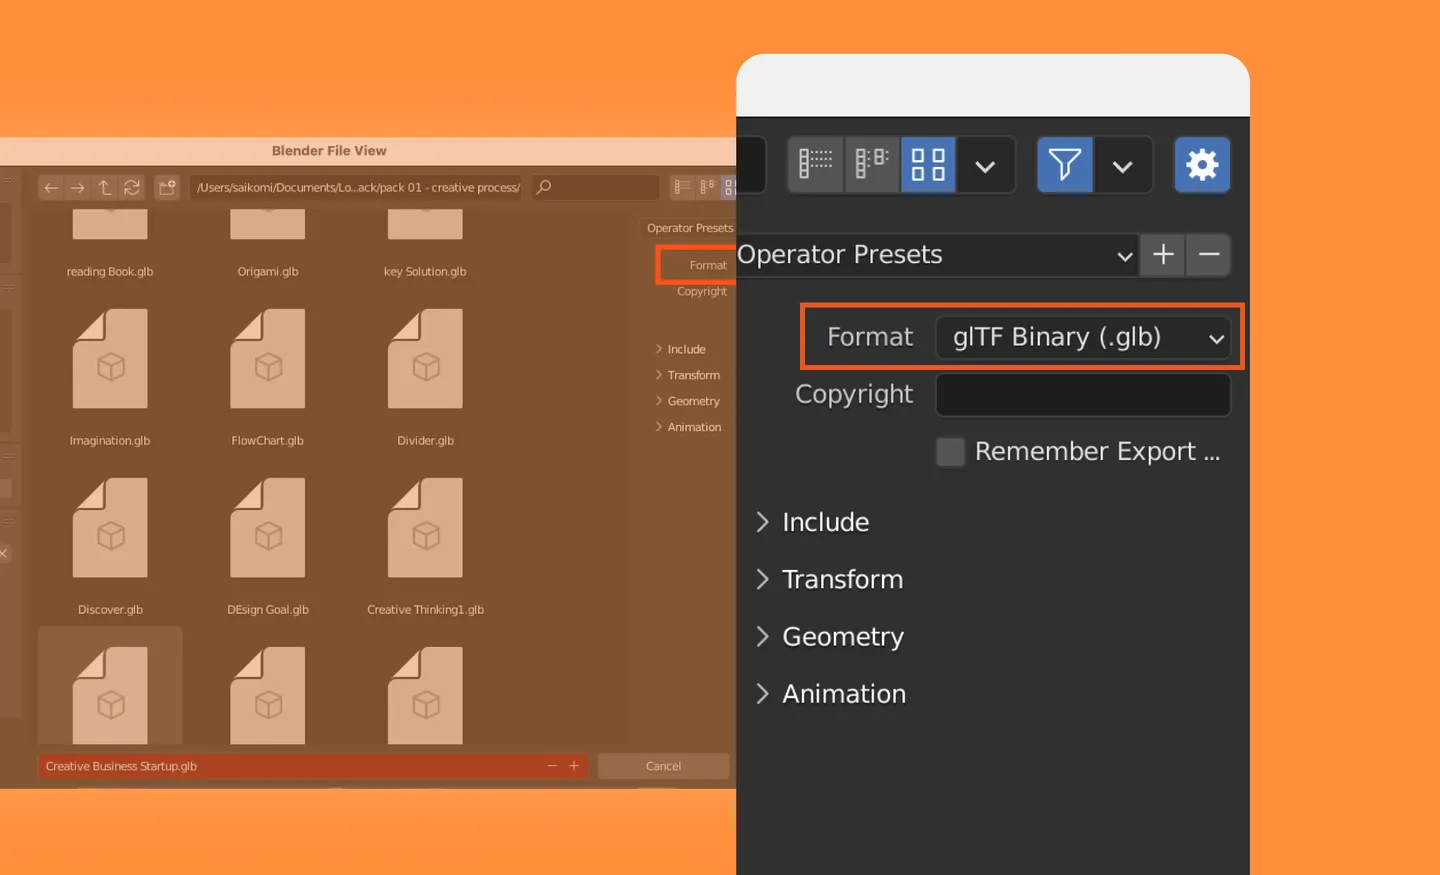
- Go to File > Export > glTF 2.0 (.glb/.gltf).
- Under Format, choose glTF Binary (.glb).
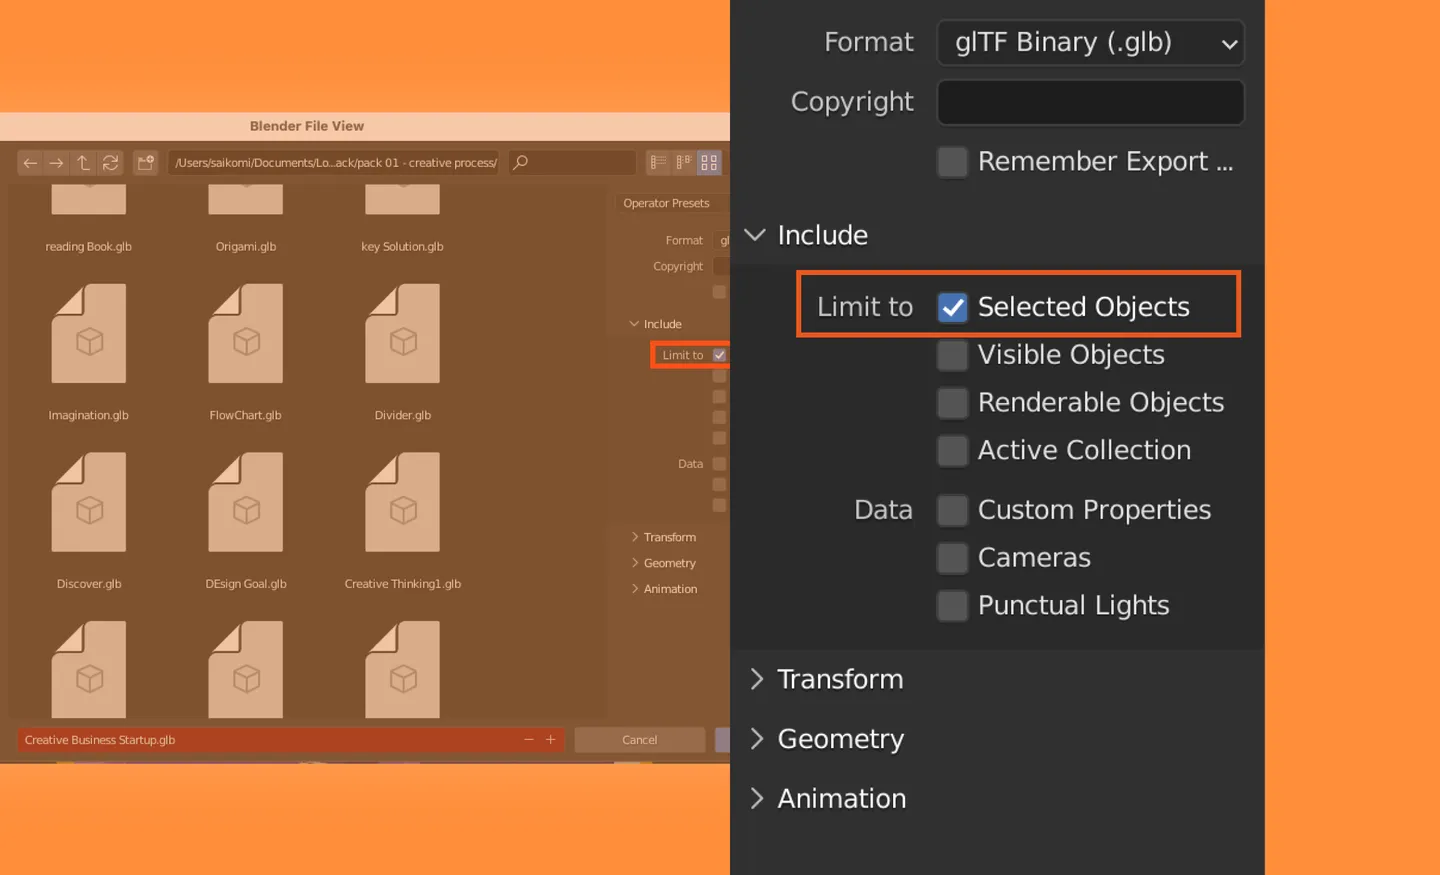
- Under Include, tick Selected Objects.
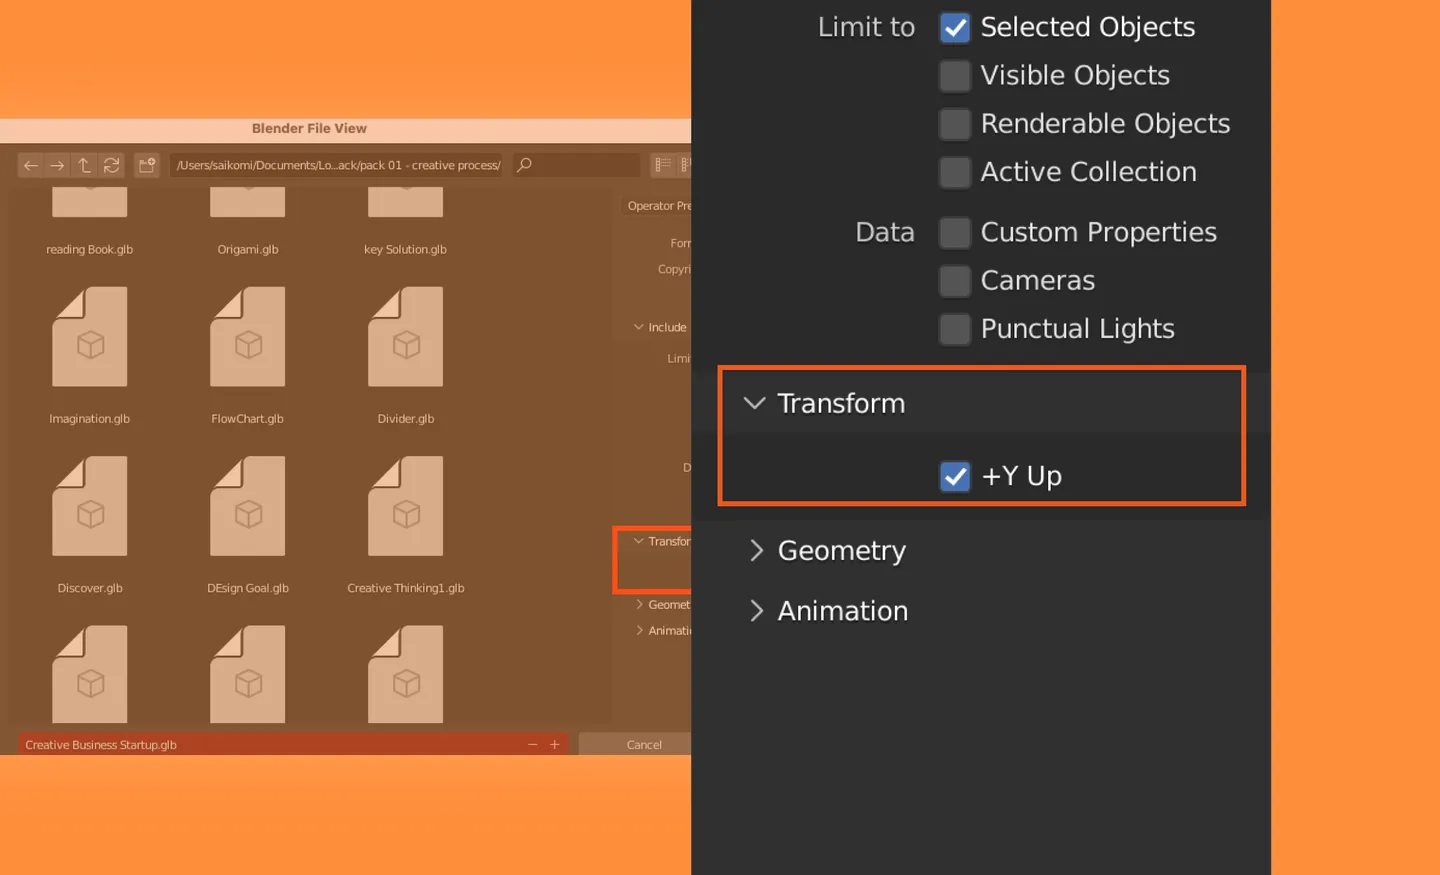
- Under Transform, tick +Y Up.
- Under Geometry, tick Apply Modifiers if you have used modifiers (like subdivision, bevel, mirror, etc.) on this asset. Tick Normals.
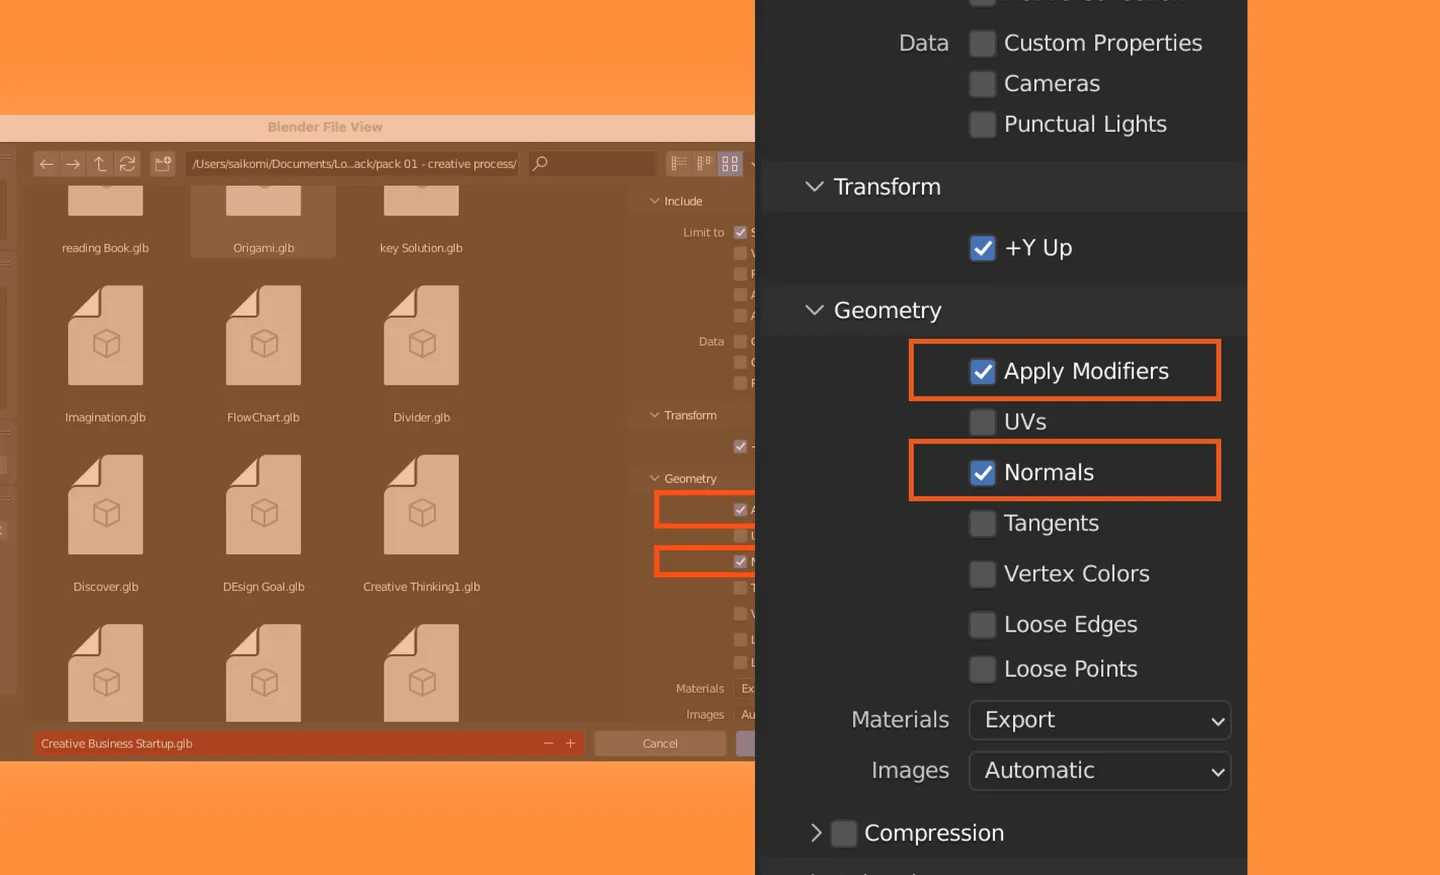
- Under Materials, select Export.
- Under Images, select Automatic.

- Untick all the settings under Animation, as there is no animation data in this file.
- Click Export glTF 2.0.
Using your glTF on IconScout
Finally, your glTF file is ready to preview and edit on IconScout. Open the glTF viewer to preview your file. Add custom palettes or experiment with preset palettes. You can also easily export PNG images from the viewer – you can use these images as thumbnails when you upload 3D assets.
We hope this tutorial has helped! To learn more about exporting your 3D files as glTF, you can also follow along with this video tutorial. And stay tuned for more glTF file format tutorials, as we’ll explore advanced techniques and customizations, as well as how to work with various file types.
Share on


Related Blogs

Access the world's largest Design Ecosystem: Assets, Integrations, and Motion.
